Showing posts with label DIY. Show all posts

DIY Faux Marble End Table

Tuesday, June 17, 2014


Guys, I loved doing this project! It's definitely one of my favorite DIY's that I've ever done and I'm excited to share.

I've been seeing a lot of marble and gold legs on end tables and coffee tables that look so chic and can still be mixed in with every day casual decor. Here are a few of my favorites...


And here is my version...


Woo-hoo!

Of course, end tables were about the last thing on my long list of things to buy for the house, but I was walking through Ross and came across this great little end table for $40 that had the wiry gold frame that everyone is getting these days. It was sturdy, but had a plain black top that was covered in scratches.


(I promise the scratches are there ;) Also ignore our crooked knobs, I've been meaning to tighten the right door.)

I didn't want something so stark so I thought that this would be the perfect opportunity to attempt a faux marble on the top. I figured that in the worse case scenario, it would look awful and I could just spray paint it black again. Plus, the table was like half the price of others I've seen even at Target and World Market so it seemed like a no-brainer to at least try.

I followed this tutorial very loosely, but it is for countertops. I decided to go for the honed marble look instead of polished, so I didn't do a glaze on top or anything like that. 

Here are the supplies I used:

-Primer (a no-sand one)
-White paint (I just used our leftover cabinet paint--satin)
-Foam roller
-About 1/8 cup of three different shades of gray paint. Again, I just mixed our leftover cabinet paint with some leftover black paint in different variations and put the different shades in disposable cups. I also added a bit of leftover green paint to one of the mixtures to add more interest.
-A lot of crinkled up plastic grocery bags
-Damp rag (key player)
-Very small short-bristled paintbrush (like cheap-o watercolor)
-Fine grit sandpaper

I had all of this on hand, so the total project was $40 just for the cost of the table.

I had to put about 5 coats of primer down and two coats of white paint to cover all of the black. Once that was dry, I put some of the lightest gray paint on my scrunched up grocery bag and began sponging it very lightly on the table top. At first, it looked awful....BUT the damp rag is key in this project--after each sponging round I would go back and sponge with the damp rag and even "wash" the table very lightly with it to smooth everything out.

After I did the lightest gray, I moved on to the medium gray using the same method. I went back over the really patchy areas by sponging and ragging with white paint. Here is what it looked like after about 5 coats of sponging/ragging:


Not too bad! I think I added more white after this photo, before I added the veins.

The veining was the hardest part. Bryan said I had "crazy eyes" while I was doing this step. Truth. I was having flashbacks of every art class I took in high school and college and the imaginary teacher was scolding me for "painting what I think I see, and not what's really there". Maddening, I tell you.

The key to the veining step is to feather with the brush instead of just painting a line (basically smoosh the bristles down in all different directions and make tiny zig zag movements). You barely need any paint for this part. I used the darkest gray for the veins and really should have taken an action picture, but I forgot amidst my crazy-eyed daze. Here is what it looked like when I was done feathering and had let everything dry:


It's not completely perfect, but I'm just so happy with how it turned out that I can't stop looking at it! Those are the  best kinds of projects. :) Of course, in true Katy fashion, I still have not sanded out the last few bumps, but maybe one of these days I will. Maybe.


I styled it really quickly and love it even more! I want to put this in our living room but unfortunately we are getting ready for a garage sale so the living room looks more like a storage unit than anything else, which all bloggers know is no good for photos, so for now it's sitting by itself in our bedroom.


The best part of this project is that it boosted my confidence enough to do faux soapstone counters in our kitchen. (Basically the same method but in black and you finish it off with paste wax.) Yep. I'm excited! 

So there you have it! Now go grab something from a thrift store and turn it into marble!

Movie Night Gift and a Popcorn Recipe

Saturday, October 19, 2013


Today I thought I would share our gift for a 'Favorite Things' couples shower that we went to last weekend. The invitation instructed us to think of something that we truly loved or was a favorite item of ours--like a favorite kitchen gadget, favorite restaurant gift card, favorite type of food, etc., and give it as a gift to the bride and groom-to-be. I thought it was a really cute idea!

Bryan and I are big-time homebodies and love to spend our evenings watching movies and eating popcorn. We have a favorite homemade popcorn recipe that I make ALL the time, so I thought it would be cute to turn this favorite date night of ours into a gift.


First, I made a recipe card and attached it to a bag of popcorn kernels. I originally got the recipe from The Nourishing Home (great site!)--but since we like a lot more fat and salt (shame), I have revised it quite a bit and have a few techniques of my own to prevent it from burning :). 

We are total popcorn snobs, but this popcorn is AH-mazing and really does taste like it's from a movie theater! It's super easy and quick to make too, which is a plus. We haven't used bagged popcorn since we first started using this recipe (which is really saying something).


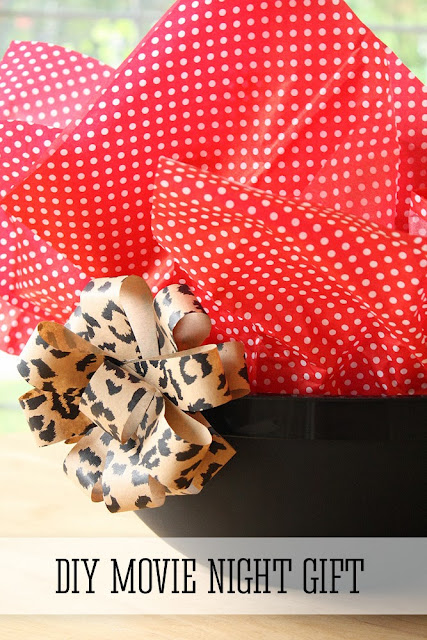
I bought most of the ingredients (with the exception of butter sticks) and put them all in a giant popcorn bowl. I couldn't find one that was really cute and inexpensive, so I settled for a plain black plastic one.

I also got a Red Box gift card online, printed it, and stuck it in there with everything else. (5 movies for $6 or something crazy cheap like that!)


After everything was assembled, I topped the whole thing off with some tissue paper (Target) and managed to make a cute little leopard print bow using some wrapping paper and hot glue. 

Of course, a lot of people like movies and popcorn so there were different variations of a movie night gift...including an actual popcorn machine. HA! I'm not kidding, though. :) 

For anyone who may want to print this recipe card, all you have to do is click here to download. You can thank me later. After you've eaten the entire bowl in 20 minutes.

Have a wonderful weekend!

Our New DIY Growth Chart (And Some Fall!)

Thursday, September 19, 2013


I have wanted to DIY a growth chart for Parker ever since he started walking. About a month ago, I finally got a free afternoon to knock this project out. And I love how it turned out!


I guess this vintage ruler trend was first started by Pottery Barn a few years ago, but all you have to do is Google search "growth ruler" and there are a million and one tutorials on how to make one yourself. Of course I did this after I was done, but oh well. ;) Jenny from Dear Lillie (one of my favorite blogs) makes and sells these and hers are perfection. If you have the money and want something professional, I would buy from her!

This project really wasn't too complicated, it just take a bit of patience. I took some pictures while I was making this and am thinking of posting my own version of this tutorial...who knows, haha.

The main supplies for this project consisted of a plain pine board from Hope Depot, some Danish Oil, a  measuring mark and number template that I made myself, and a Sharpie. Oh and scissors, a pencil, and a ruler. 


We have this in our entry and it is too darn narrow to get a shot of the whole thing from the front. 


I also put out some of my fall decorations! I still want to switch out that botanical print for one a fall-themed one, but I really love how this vignette looks. I will share more details next week, most likely.


The ruler is not completely perfect, although I really tried my best. It only cost us about $8! I LOVE this project.


So, there's that. I hope you all are having a wonderful week. Sorry for my sporadic posts this week and last, I hope to get some free time this weekend to get ahead on posts.

Have a wonderful day!

Quick Fix.

Thursday, July 26, 2012

Hi there! First, thank you all so much for your well wishes on our third anniversary yesterday! It is truly crazy how fast time flies.

A few days ago, I shared how we lined the binds for privacy in our guest bedroom and nursery. Yes, they work great, yes it was cheap to accomplish, BUT there was one problem with our "After".


Our new "blackout" blinds weren't exactly the prettiest things to look at from the outside. Whoops :). (Don't mind the sprinkler--just keeping it real!)

My OCD self had to figure out a solution...SO I headed to the fabric store, bought some clearance outdoor fabric (ticking stripe baby!), and did a little hemming....


A little ironing....


And then staple-gunned my blind-covering concoction right on to the top of blinds...


Side Note: Don't you just hate when you finish a project and in all of your "I'm Finished!" happiness are bummed to realize that you need to take it down and fix something? That is the downfall of all DIY projects in my opinion.

...And re-hung the new and even more improved project for the outside world to see.


Ahhhhh, so much better. My OCD-ness can calm it's little self down now. ;)


Are there any projects that you have had to re-do to make them more functional for your lifestyle and space?

We are headed to the airport to pick up my sweet mother-in-law for a weekend of fun and baby-kissin'! Have a great day.